6 meter 50 MHz Squalo antenna
An omnidirectional, horizontally polarised antenna for the 6-meterband / 50 MHz built by Thom van der Klis PA9T
English: I have been thinking on getting active on the 6-meterband for a while now. The main reason is the increasing amount of QRM at HF at my location, making it nearly impossible to make a QSO. I also like to change things now and then, and becoming active on a new band is part of that.
Nederlands: Al langere tijd zat ik er over te denken om actief te worden op 50 MHz / 6 meter. Enerzijds omdat de hoeveelheid QRM thuis ervoor zorgde dat HF steeds minder goed werkbaar werd, anderzijds omdat ik het leuk vind om zo nu en dan weer eens te wisselen naar een nieuwe band.
Goals:
English: The new antenna had to be compact, omnidirectional and horizontally polarised. I didn’t want big beams oR directional antennas, in order to keep the visual impact as small as possible. There is enough stuff on the roof already. The main goal was to work some Es during the summer season, and to do an experiment to see if meteor scatter was possible with such antenna. I found a design made by Jan PA3EGH on the website of Ernest PA3HCM that looked easy to reproduce. This design fulfilled all my needs.
Nederlands: De nieuwe antenne voor 50 MHz / 6 meter moest compact en omnidirectioneel zijn en bovendien horizontaal gepolariseerd. Hierdoor vielen bijvoorbeeld verticals af. Ik wilde ook geen richtantenne, om het bescheiden te houden voor de buurt. Het doel was om in het sporadische E seizoen wat verbindingen via Es te maken, en om te experimenteren of met deze antenne meteorscatter mogelijk is. Op de website van Ernest PA3HCM stond een ontwerp van Jan PA3EGH (welbekend binnen afdeling Centrum natuurlijk) welke er makkelijk uitzag, en bovendien aan al mijn eisen voldeed.
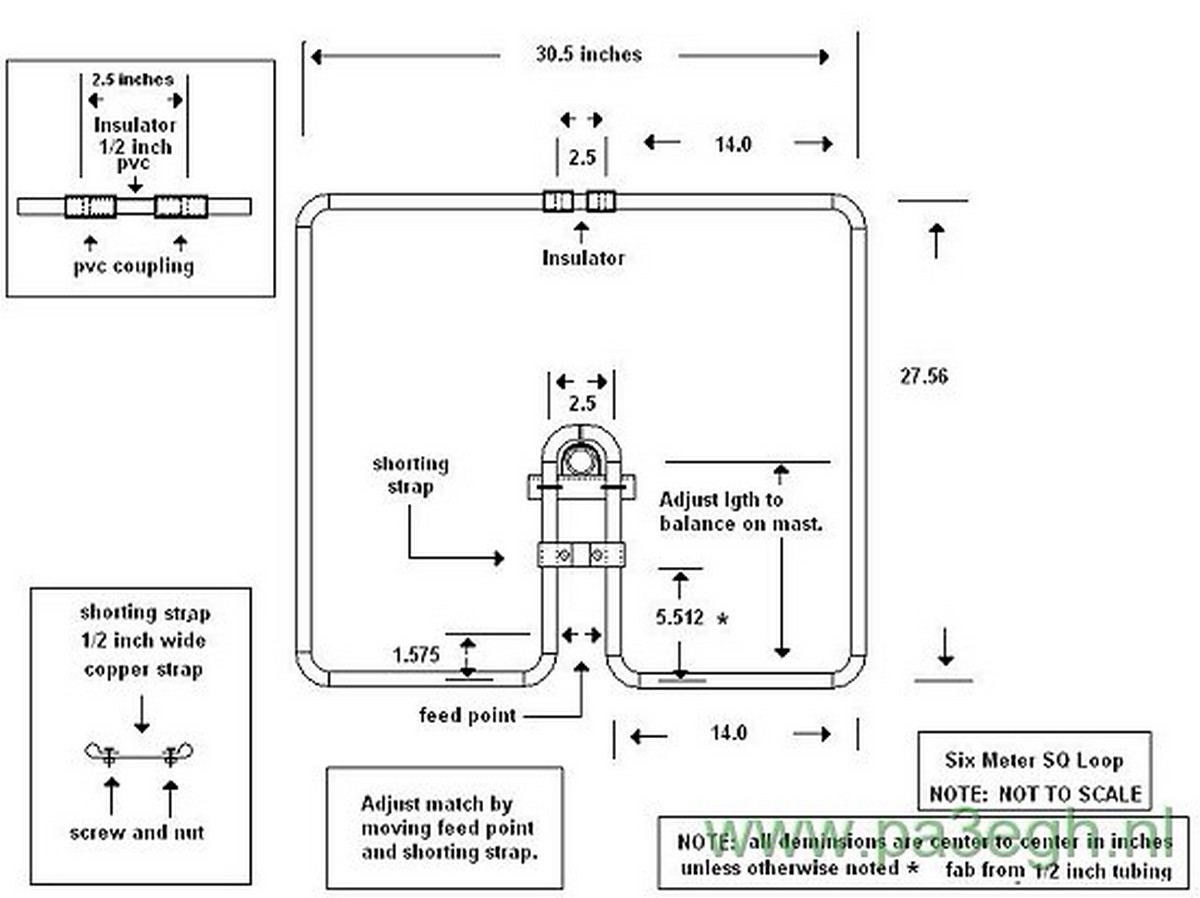
Original design of the 50 MHz Squalo by Jan PA3EGH, found on the website of Ernest PA3HCM
| Inch | mm |
| 30,5 | 775 |
| 2,5 | 64 |
| 14,0 | 356 |
| 27,56 | 700 |
| 5,512 | 140 |
| 1,575 | 40 |
MMANA-GAL Simulations
English: I was interested in the gain, and I was also interested in the bandwidth of this antenna. Besides that, the antenna needs to be tuned with the shorting strap and feedpoint position, basically forming a hairpin match. The shorting strap determines the resonant frequency and the feedpoint position determines the match to 50 Ohms. Of course, both parameters will influence each other. I was interested in this effect.
After putting the antenna in MMANA-GAL, simulations revealed the this antenna was pretty small-banded, with an SWR 1:2 bandwidth of only 954 kHz around the center frequency of 50.5 MHz at an antenna heigh of 5 meters above ‘real ground’. This is a fractional bandwidth of 1.88%, which is far less than a typical dipole of 4%. Probably the folded design has it’s toll on bandwidth. The Squalo has a gain of 6.2 dBi in the horizontal plane, where the side lobes are -4.4 dB compared to the main lobe. The feedpoint impedance needs a lot of prunning with the shorting strip and feedpoint position to get it near 50 Ω, and the final impedance of 49-j0.270 Ω (SWR 1.02) is slightly capacitive.
Nederlands: ik wilde van deze antenne de gain en bandbreedte weten. Bovendien moet van deze antenne de positie van de kortsluitstrip en voedingpunt (hairpin match) worden bepaald. De positie van de kortsluitstrip bepaalt de resonantiefrequentie en de positie van het voedingspunt bepaald de aanpassing naar 50 Ohm. Uiteraard hebben deze twee parameters invloed op elkaar.
MMANA-GAL liet zien dat deze antenne behoorlijk smalbandig was, met een SWR 1:2 bandbreedte van maar 954 kHz rondom 50.5 MHz. De antenne had hierbij een hoogte van 5 meter boven ‘real ground’. Dit is een fractionele bandbreedte van 1,88%, wat fors minder is dan de typische waarde van een dipool met 4%. Blijkbaar eist het gevouwen ontwerp zijn tol. De Squalo heeft een gain van 6.2 dBi in het horizontale vlak, waar de zijlobben -4.4 dB zijn t.o.v. de hoofdlob. Het kostte een hoop tijd om de impedantie van het voedingspunt op 50 Ω te krijgen, en het eindresultaat was niet slecht: 49-j0.270 Ω.
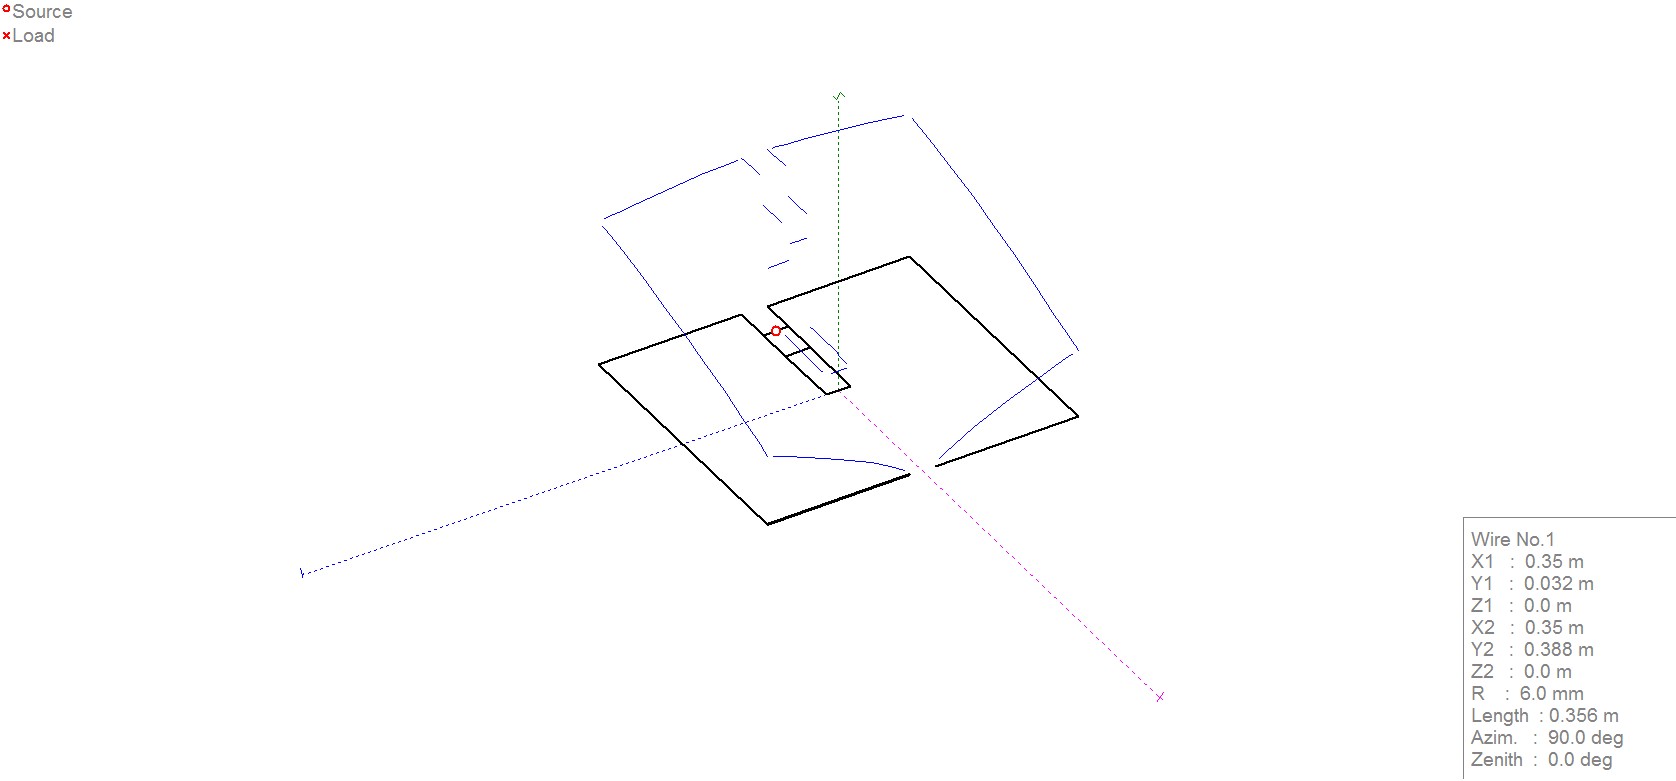
MMANA-GAL design with current distribution
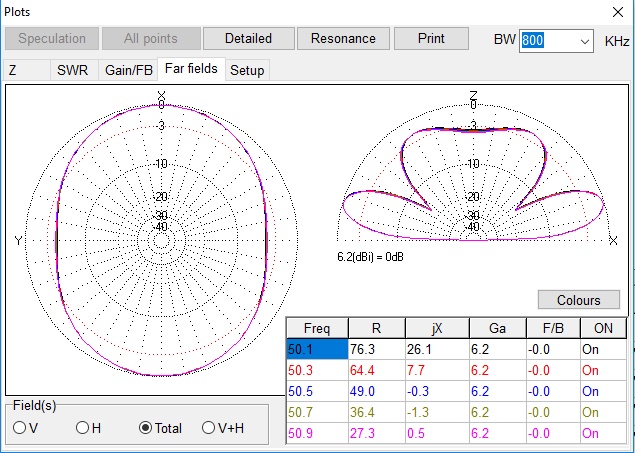
Far Field plot: 6.2 dBi of gain, with a -4.4dB dip of the side in the horizontal plane
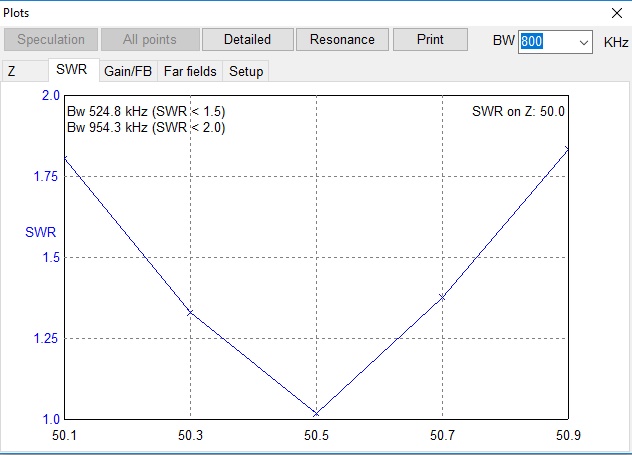
Bandwidth of the 50 MHz Squalo
Balun
English: the Squalo is a symmetrical antenna, and because I have coax to feed this antenna, I needed a balun to avoid sleeve currents. I found a 4C65 core in my junk box, and the datasheet showed that this material was still usable on 50 MHz! I used mini Ring Core Calculator 1.3.0 to simulate my balun. It showed a nice Xl of 854 Ω with 4 windings. This is a bit more than 10x the feedpoint impedance, which is a good rule-of-thumb value. And 4 windings can be squeezed onto the core with some caution.
Nederlands: de squalo is een symmetrische antenne. Ik voed hem met coax, dus een balun is noodzakelijk om mantelstromen te voorkomen. In de junkbox vond ik een 4C65 kern, en de datasheet van dit materiaal liet zien dat het op 50 MHz ook nog bruikbaar was. Ik heb het programma mini Ring Core Calculator 1.3.0 gebruikt om de balun door te rekenen. Dit liet een Xl zien van 854 Ω met 4 windingen. Een vuistregel luidt dat de impedantie van een dergelijke balun iets groter moet zijn dan 10x de impedantie in het voedingspunt van de antenne. Dit voldeed dus, en 4 windingen zijn ook nog enigzins op zo’n kern te wikkelen.
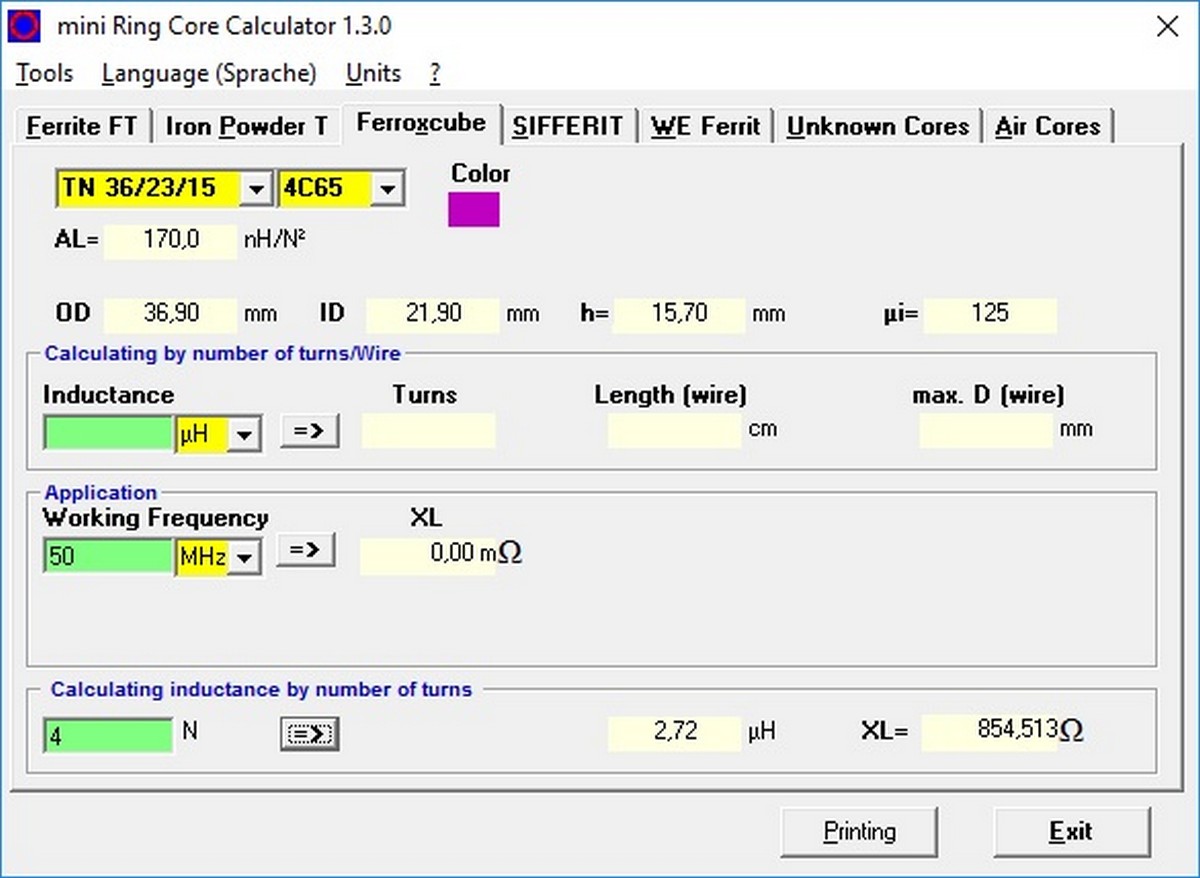
mini-Ring Core Calculator shows an nice Xl of 854 Ohm for my balun, which is a good value in this particular case
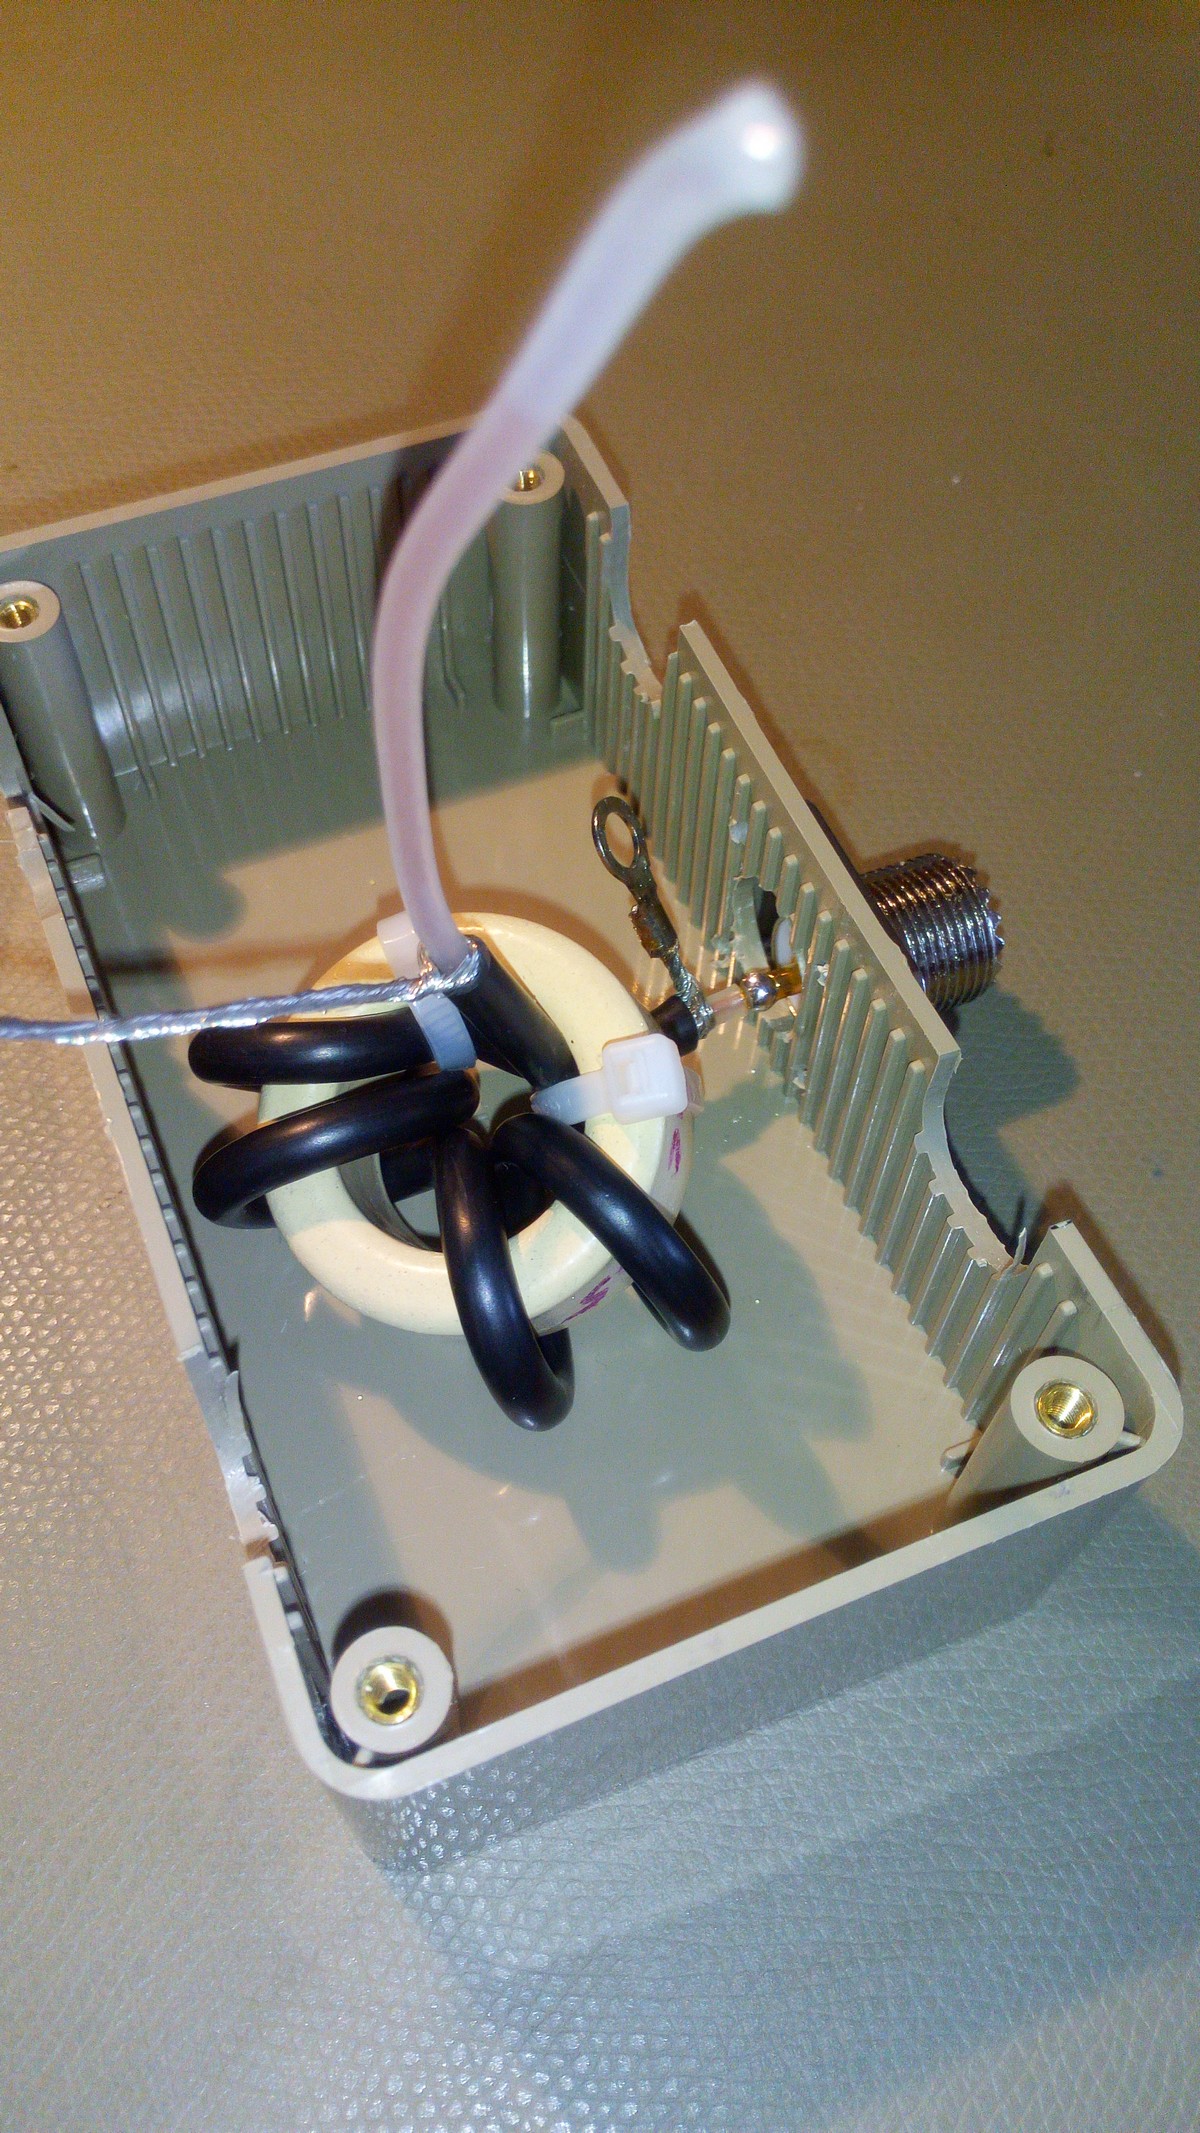
The balun is it’s case
Testing the design
English: after assembling the copper tubing en antenna carrier, I wanted to determine the position for the shorting bar (hairpin match) and the launching. of course soldering wasn’t an option yet, so I gave my YL a washing break by stealing her clothespins. This made tuning very easy!
Nederlands: nadat het pijpwerk in elkaar was gesoldeerd, moesten de posities van de kortsluitstrip en het voedingspunt worden bepaald. Hiervoor heb ik de wasknijpers van mijn vriendin gebruikt. Het kwam haar ook wel goed uit blijkbaar, want ik heb geen klachten gehad!
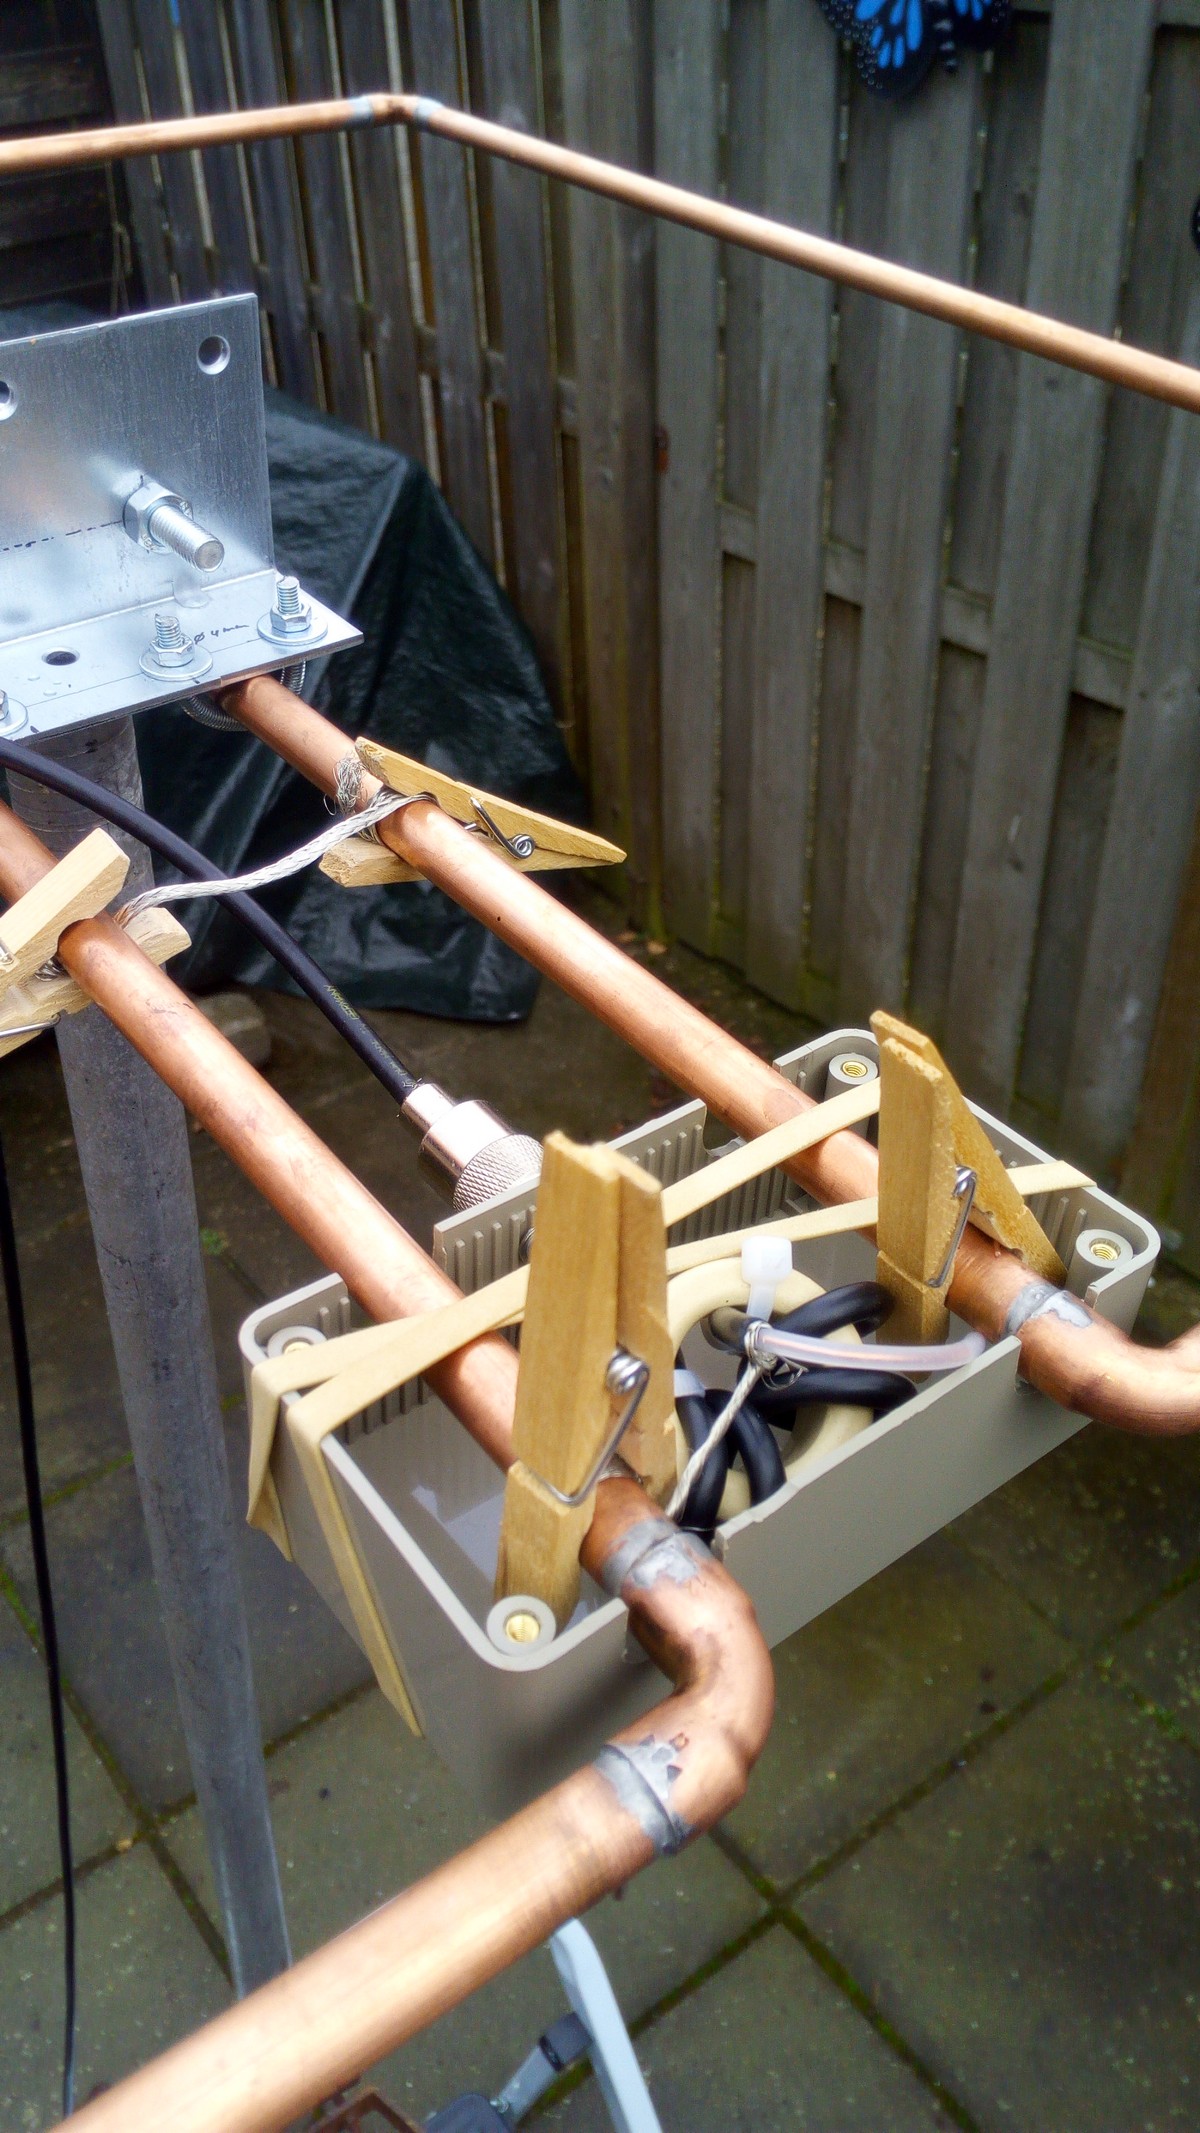
I gave my YL a washing break by stealing her clothespins. This made tuning very easy
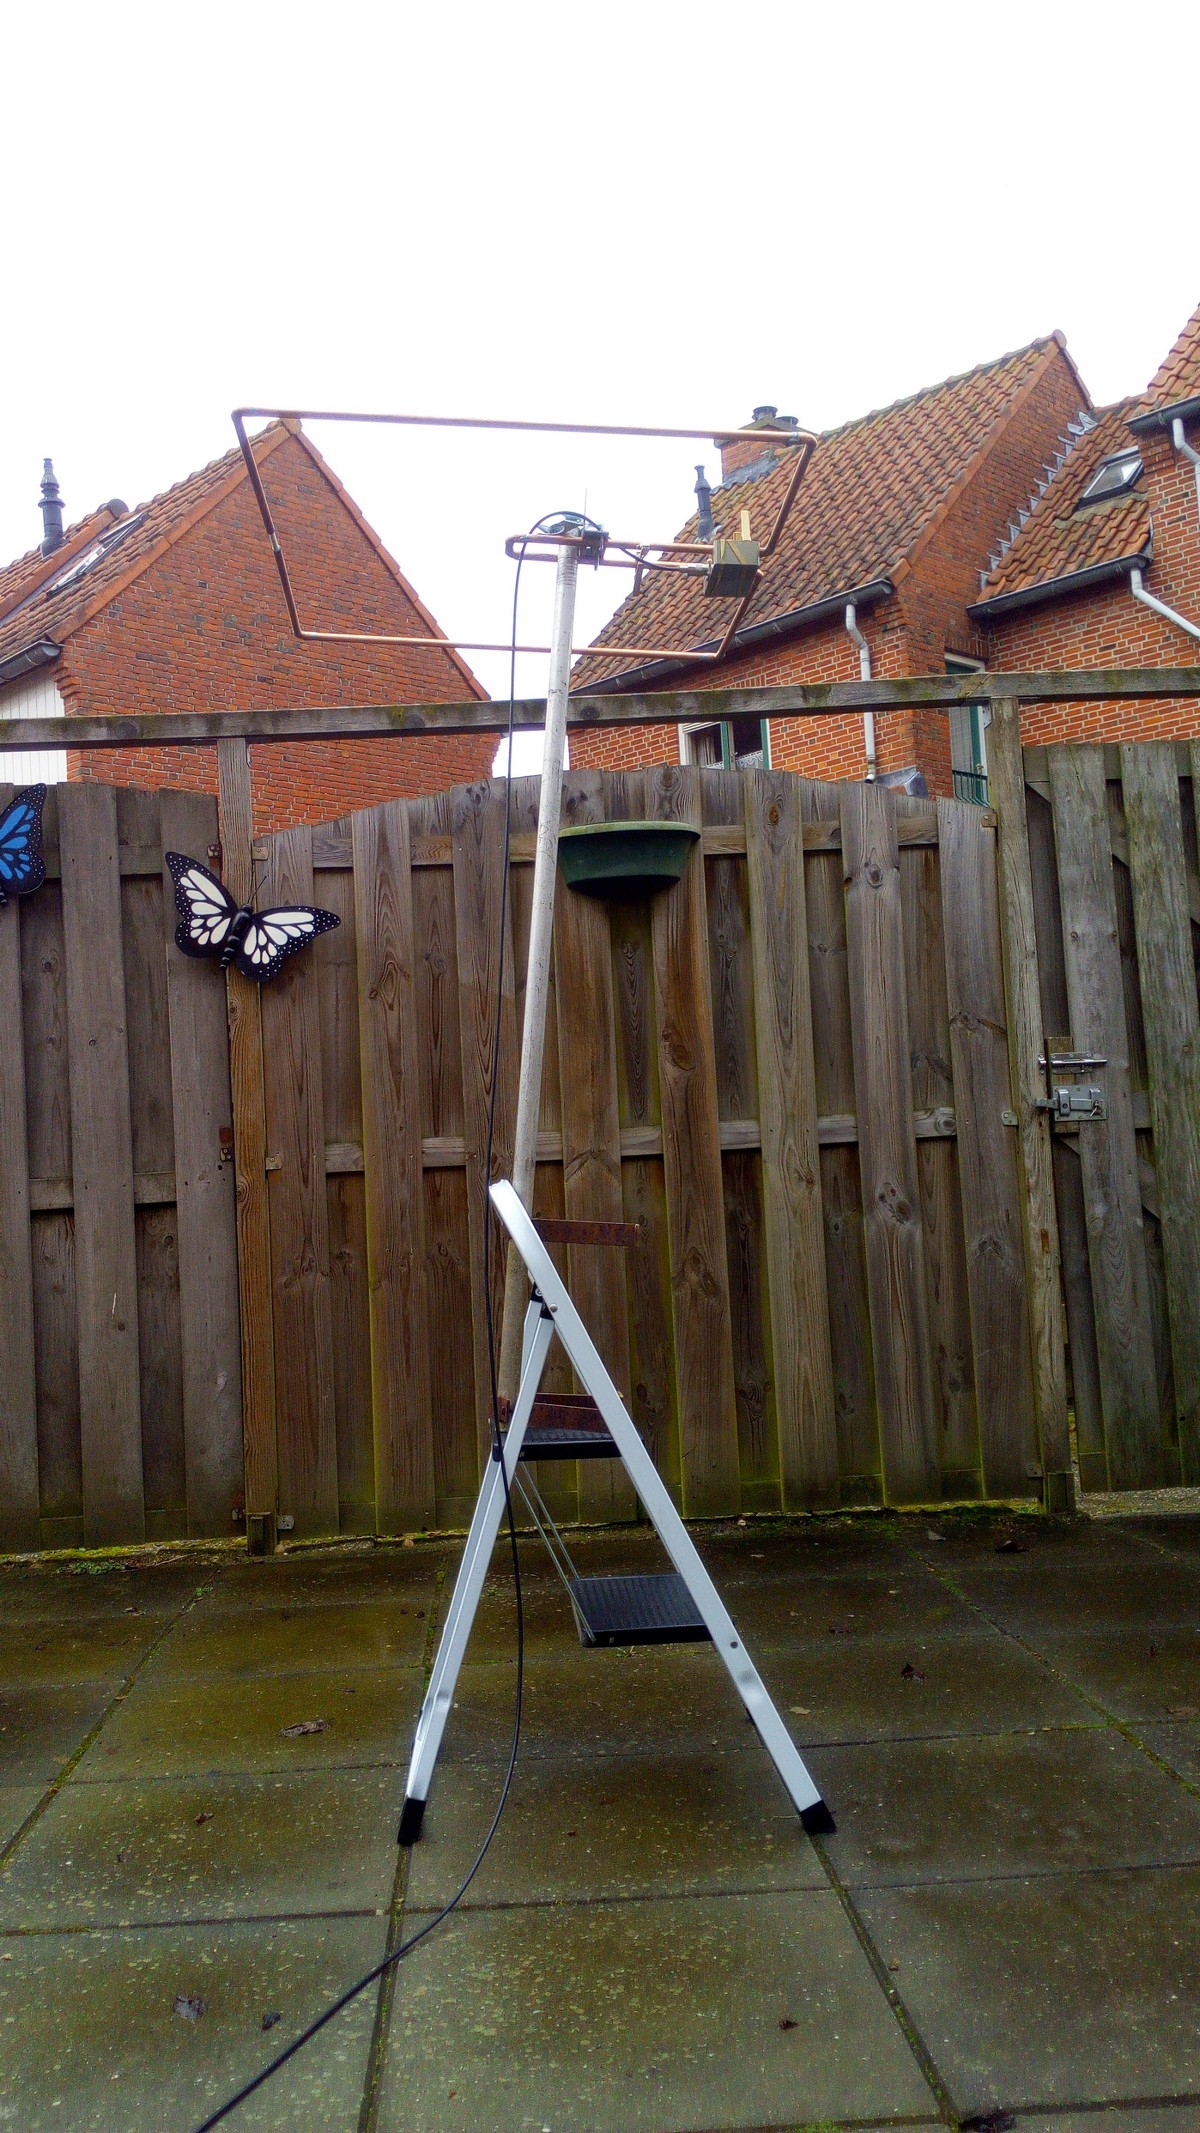
Simple yet effective. After the squalo is finished, it’s time to kill all the algae in the garden…
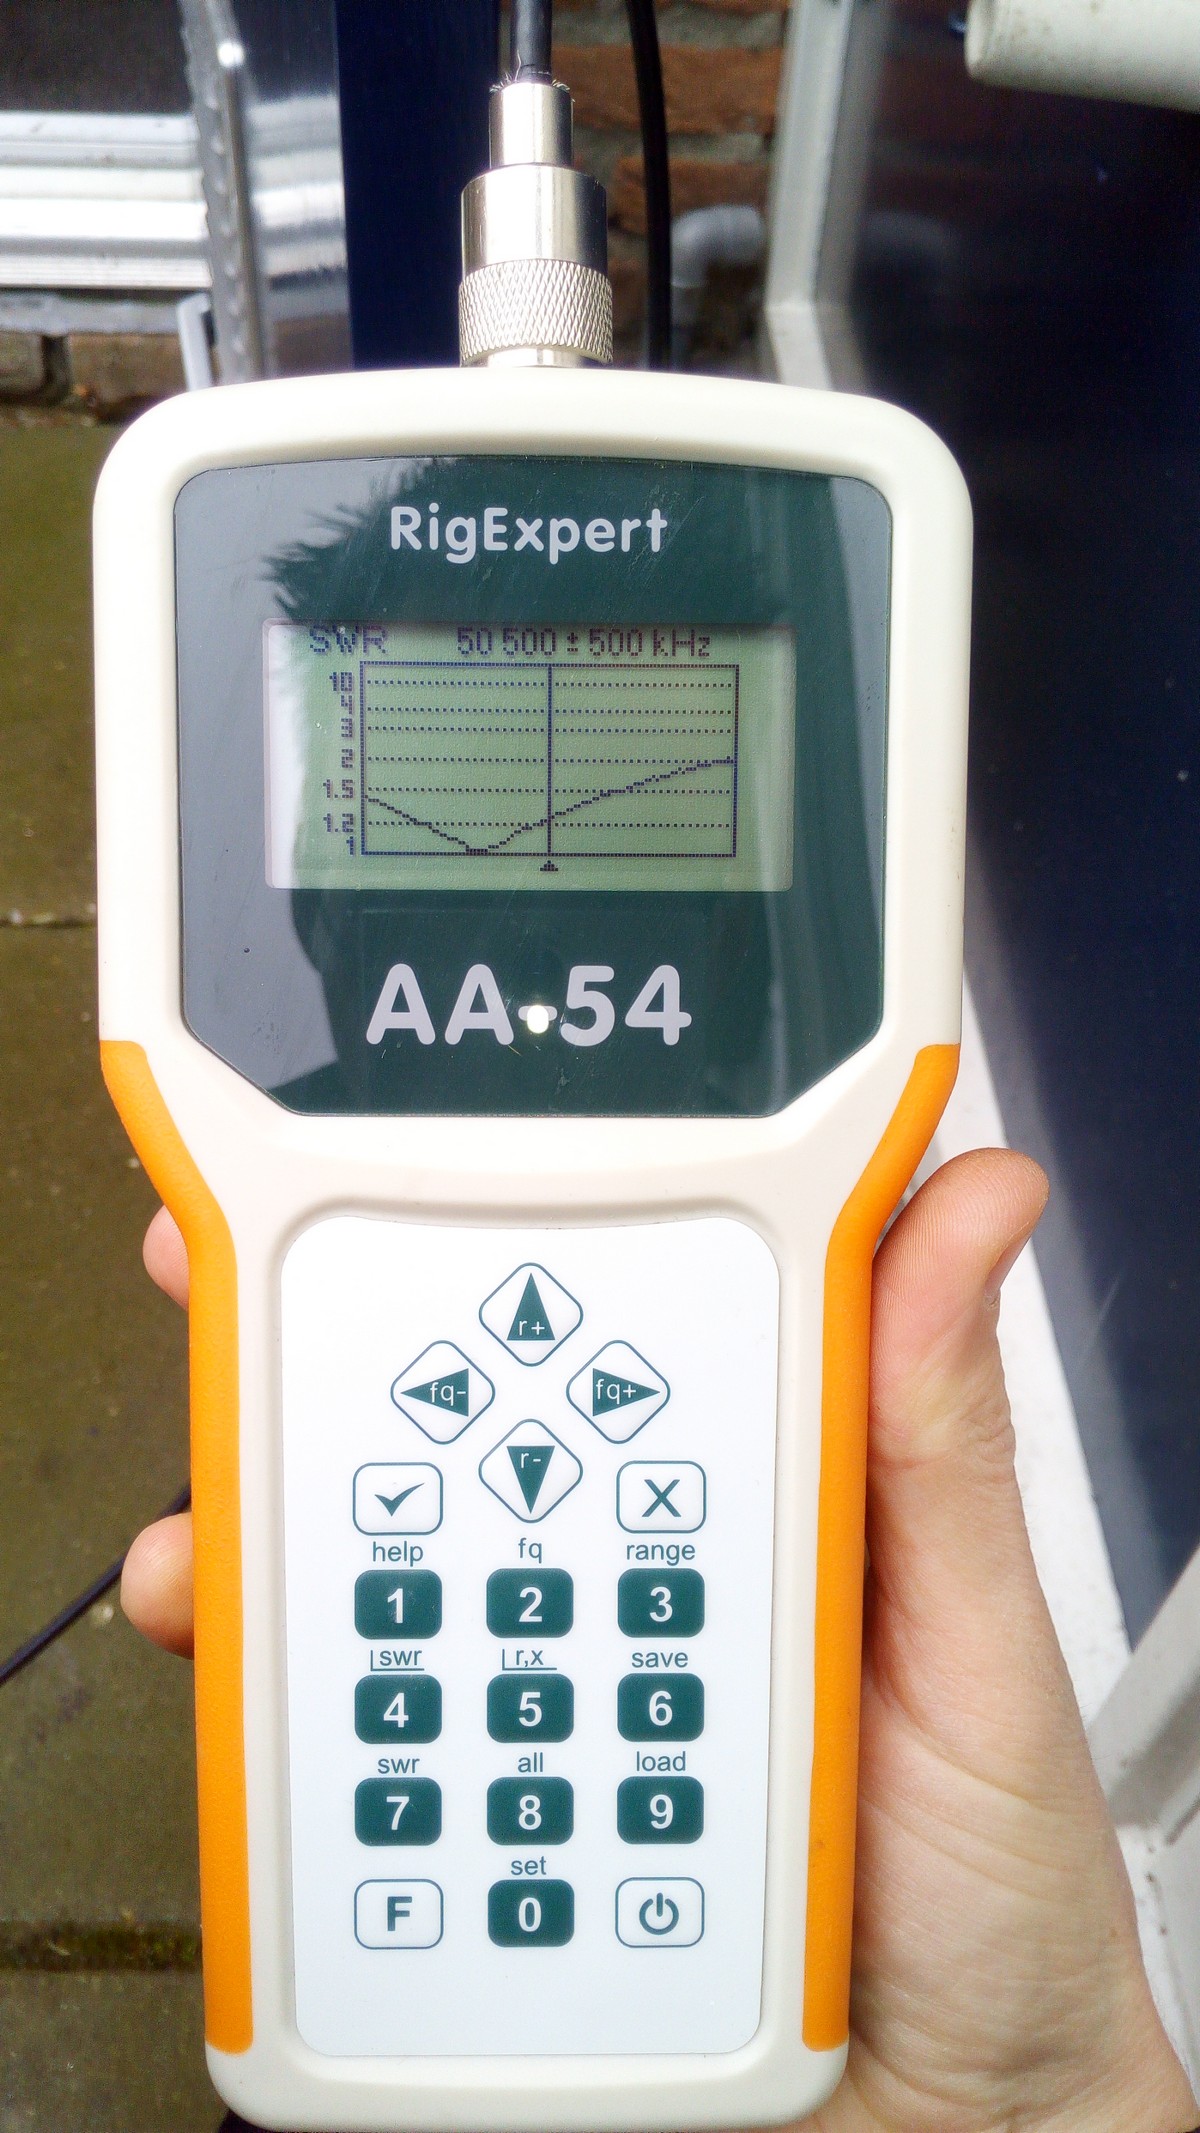
Expert AA-54 borrowed from Karel PA1RLM. Real life measurements matched my simulations! Woohoo!
Construction
English: construction is pretty straightforward, and I will not use text to explain everything. Please refer to the photo’s below. When the whole antenna was assembled, I used waterproof sealant used for cars (don’t use silicone since it doesn’t work with ABS) to glue the housing together, and to make all holes watertight. In the bottom of the grey housing is a small 3mm hole though, to let water out in case the sealing fails.
Nederlands: de assemblage is vrij simpel, en ik verwijs dan ook naar de foto’s hieronder. Nadat de gehele antenne was gebouwd, heb ik nog wel alle gaten en kieren dichtgekit met waterbestendige bitumineuze kit. Gebruik geen siliconen, want dit hecht niet op ABS! In de bodem van het grijze behuizinkje heb ik echter wel een klein gaatje geboord, zodat eventueel vocht wel kan ontsnappen.
Bill Of Materials
English: the following list will give you a good impression on the materials I used. Sizes are metric.
- Copper tubing 12mm length 2,5 meter
- Copper tubing 12mm length 1 meter
- Car exhaust clamp 52mm
- Wood construction angle 115×60 mm
- Threaded stud 1 meter 4mm2
- 2 boxes of copper soldering angle for 12mm buis
- Gray housing ABS, 65 mm, IP54, 60 mm (Farnell 1171683)
- 4C65 core
- 10 cm RG-58 coaxial cable for balun
- Lot’s of waterproof sealant used for cars
- PL259 connector female + screws and nuts
Nederlands: de onderstaande materiaallijst geeft een indruk van het materiaal dat ik heb gebruikt.
- Koper buis 12mm lengte van 2,5 meter
- Koper buis 12mm lengte van 1 meter
- Uitlaatklem Gamma 52mm
- Verstevigingshoek Gamma 115×60 mm
- 1 meter draadeind 4mm2
- 2 doosjes koperen hoekstukken voor 12mm buis
- Grijze behuizing ABS, 65 mm, IP54, 60 mm (Farnell 1171683)
- 4C65 ringkern
- 10 cm RG-58 coax
- Heel veel bitumenkit voor auto’s
- PL259 chassisdeel met boutjes en moertjes M3
Construction photo’s